Complete repair and ongoing maintenance of locomotive for use as museum's main motive power. The gas-mechanical switch engine is "right sized" for moving the other cars on display.
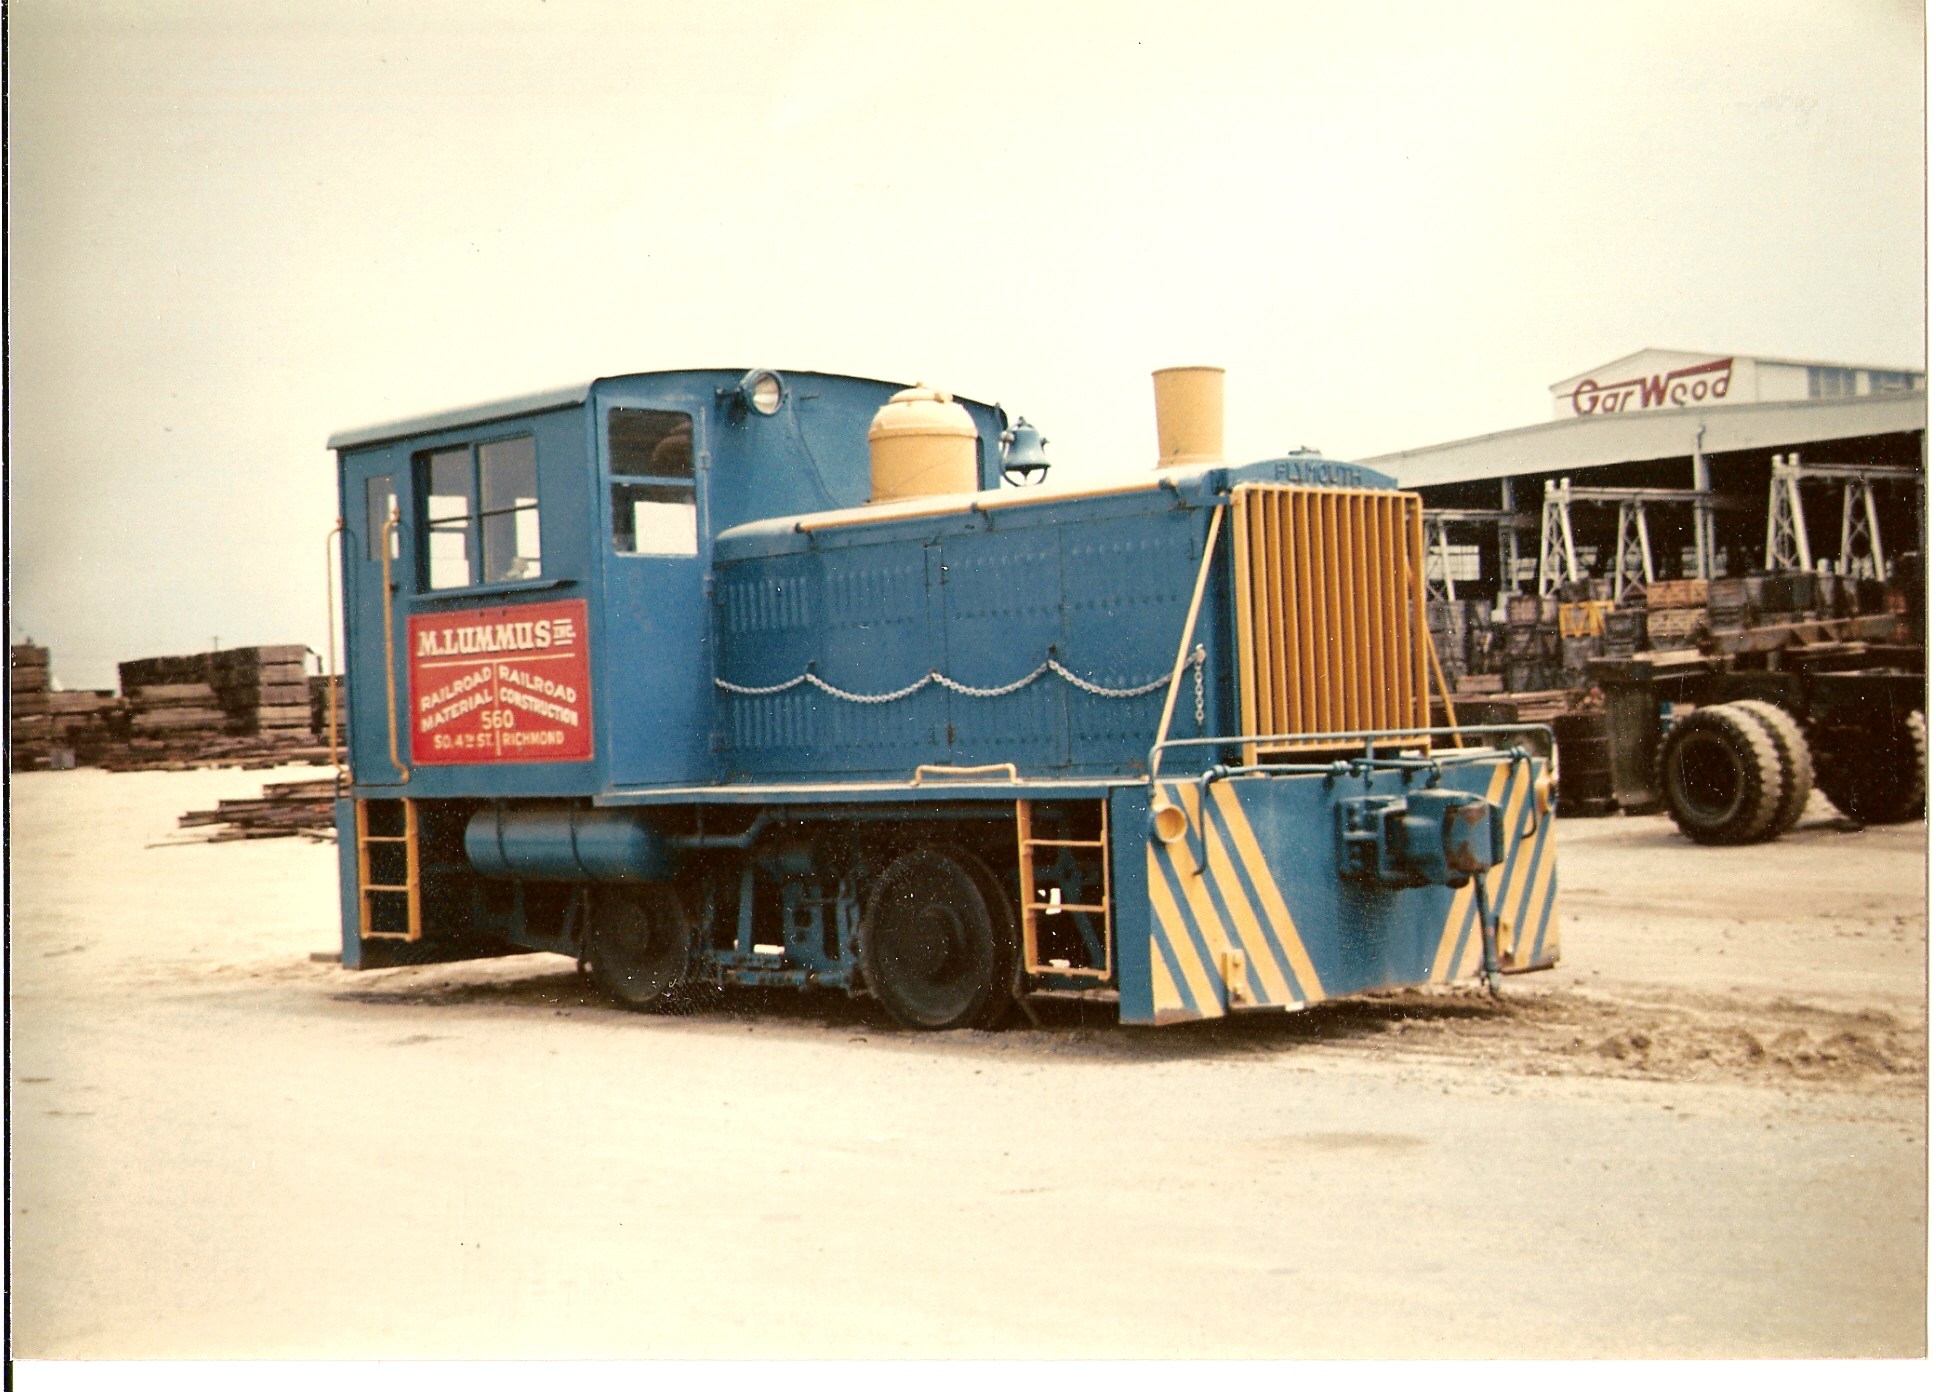
Built in a group of 24 locomotives
for the U.S. War Department, serial numbers 4441 to 4464, this serial number
4463 was the last member of the group delivered on March 26, 1943. It was
assigned number US 7595, and stationed at the Army Air Corp’s Victorville
Advanced Flying School, in Victorville CA. In November 1966, it was sold to
private company M. Lummis & Co of Richmond CA. It was later owned by Pacific
Railroad Contractors of Torrance CA, and finally Railroad Builders of Mira Loma
CA, who donated the locomotive to the museum in 1988.
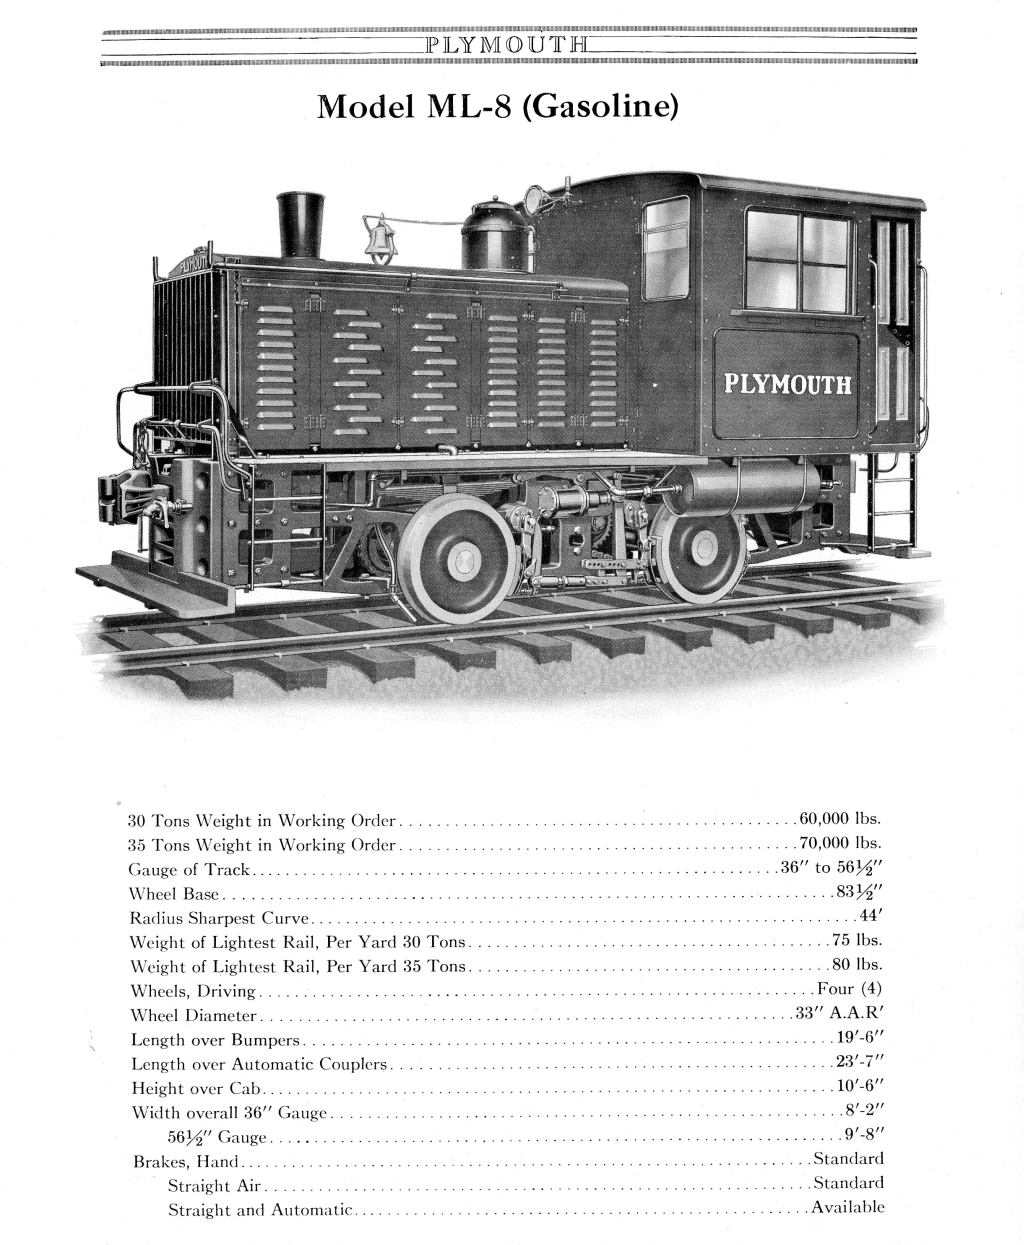
Unlike many of this type that have been refitted with a diesel engine, this
Plymouth ML-8 locomotive still has the original Leroi Model RX1V, 250-HP, V8
gasoline engine with a displacement of 2008 cubic inches. Power is transmitted
to the wheels via a clutch and 4-speed mechanical transmission, with chain drive
to the axles.
The locomotive was cosmetically and functionally restored by museum volunteers.
In 2005, in honor of the locomotive’s long-term caretaker, it was named the
"George E. Holt".
For many years after its restoration, the locomotive was maintained in operating
condition, and was used frequently for switching cars on the museum grounds.
Unfortunately, in April 2011, the integral air compressor failed, which caused
extensive collateral damage to the engine’s front gear casing and radiator. Work
is underway to make the necessary repairs and return the locomotive to service.
The museum has purchased two stationary Leroi engines that were originally used
to power cotton gins, which will serve as a parts source for the Plymouth’s
engine.
|
|
|
|
| Plymouth Loco at Richmond, CA. June 1964. | Plymouth catalog page for ML-8. | Complete Plymouth ML6 / ML8 Catalog. |
This Log Book is being started after an extended period of repair work performed on the Plymouth. Two major problems were addressed:
1) A large hole developed in one cylinder wall. Cylinder was bored and re-sleeved. The corresponding head also developed cracks. Head was repaired.
2) A broken valve part destroyed the compressor piston. New valve parts and a piston were fabricated and installed.
The following organizations have made donations of materials, labor, and/or monies to aid in this restoration project:
R. Conrader Company
The Conrader Company refurbished the Plymouth’s air compressor unloader pilot valve at no charge. When that did not correct the problem, they swapped their historical display unit for the one in the locomotive (again, at no charge). That’s mighty fine customer service, 62 years after the sale!
September 07, 2013
Installed a ‘bee cap’ (a.k.a. baked bean can) on the open end of the pipe
leading to the air reservoir.
August 31, 2013
Painted the two oil filler caps. No bees observed this week.
August 24, 2013
Primer-painted the two oil filler caps. Scraped more gunk from the engine, this
time deep inside the ‘V’ of the engine block. No one had been down there in a
VERY long time! Noted a large number of bees around the locomotive, concentrated
near the open pipe on the main reservoir.
August 17, 2013
Scraped and degreased a thick layer of crud from the two oil filler caps, and
scraped more gunk from the engine and frame.
July 27, 2013
Applied sealant to the remaining three valve covers. Also installed ‘rain caps’
(a.k.a. baked bean cans) to the four valve cover breathers. A perfect fit! A
small amount of water was drained from the crankcase. Scraped more gunk.
July 20, 2013
During a routine check for water in the crankcase, a LOT of water was discovered
in the crankcase. Fortunately, a ‘sniff test’ revealed it to be rainwater, not
coolant. Applied sealant to one of the valve covers in an effort to prevent
water getting in the engine. Scraped much gunk from the engine.
June 22, 2013
Did more filing on the crankshaft. Reinstalled the pulley hub, using a
combination to steel plates, threaded rod and nuts to ‘pull’ the hub onto the
crankshaft. This was done to avoid pushing on the crankshaft, which could have
damaged the bearings. Despite applying much force, the pulley hub did not seem
to engage farther onto the crankshaft than before.
June 15, 2013
Removed the pulley hub from the crankshaft, and found some ‘lumps’ in the
surface of the crankshaft, which might be interfering with the complete
engagement of the hub on the shaft. Some filing was done on the offending parts
of the crankshaft, but more is needed.
May 25, 2013
Disconnected the caburetor’s air intake hose, choke cable, throttle linkage,
fuel line and vacuum bypass connection. Also turned off the fuel valve located
at the base of the air cleaner. Removed the carburetor, cleaned its exterior,
and began disassembly of the major components. Cleaned the gasketed surfaces.
Discovered that the idle jet is damaged.
May 2013
Straightened up the cab interior, and hosed-off the exterior in preparation for
National Train Day. For the day of the event, the cab doors were open for
viewing, but no access to the cab was allowed. The tarp was removed from the
engine so visitors could see the progress.
April 2013
Purchased a $209 carburetor rebuild kit #CS1065 from the Carburetor Shop of
Eldon Missouri, which includes several gaskets, screws, washers, and a needle
valve seat. Also obtained a 1944 War Department Technical Manual TM 9-1826C,
Ordnance Maintenance, Carburetors (Zenith), which contains pertinent information
on the Zenith 1510MV carburetor.
March 2013
Installed the packing-retaining ring around the pulley hub. Used two layers of
¼” square Graphite packing to seal around the pulley hub. Installed the pulley
hub on the crankshaft, but it doesn’t seem to go on far enough. At this point it
is uncertain whether the parts are just being stubborn, or if there is a
compatibility issue. Research continues on a replacement air compressor.
Sent an inquiry to Zenith Fuel Systems regarding the carburetor. They do not
have parts but did send a service manual. Also sent an inquiry to another
company advertising a kit for the carburetor, but haven’t received a response
yet.
Posted Plymouth ML6/ML8 Catalog, Roiline Engine Manual, and Zenith Carburetor
Manual to the website’s Technical Library. The catalog is also posted on the
Project Page.
February 2013
The locomotive was moved to the north side of the crossing to facilitate welding
of the damaged crankshaft keyway. The keyway was repaired by welding and
grinding. Self-adhesive cork was used to fabricate a new gasket for the gear
cover. The gear cover was successfully transplanted on the locomotive’s engine.
Everything seems to line up okay.
January 2013
Removed the pulley hub from Texas engine #2, and found it to be in much better
condition than the one from engine #1. The hub was cleaned and painted.
Significant damage to the keyway on the Plymouth’s crankshaft was discovered.
This needs to be addressed before the gear cover can be installed. Installed two
new engine mounting bolts and added US and Arizona flags.
December 2012
Refurbishment of the ‘new’ gear cover is complete. Several minor issues remain
before it can be installed on the engine. The oil splash-ring needs to be
modified to fit the Plymouth’s engine, a pulley hub seal needs to be fabricated,
and a bottom-edge gasket needs to be cut. Investigation is also underway to
determine if the pulley hub on the other Texas engine is in better condition.
Removed the two front engine mounting bolts, which were loose. These will be
replaced.
November 2012
The pulley, pulley hub, and the gear cover were removed from one of the ‘Texas’
engines and test fit on the Plymouth’s engine. All holes seem to line up
properly, and the front end of the crankshaft appears to be the same on both
engines. Cosmetic restoration of the ‘new’ gear cover is underway before final
mounting on the Plymouth’s engine.
October 20, 2012
Palletized the radiator assembly and gear cover removed from the locomotive, and
transported them to the bullpen for safekeeping. Began disassembly of one of the
Texas engines by removing the pulley and other ‘junk’ on the front of the
engine.
September 22, 2012
After some delay, the LeRoi engines from Texas arrived intact at the museum.
Many thanks to Larry Benedict for facilitating the engines’ purchase and
arranging for transportation. The intake manifolds and part of the exhaust
manifolds on both engines are smashed, probably from the collapse of the
building where they were originally located (this was a known condition at the
time of purchase).
September 15, 2012
After scraping and scrubbing of the carburetor in the search for a nameplate or
other identifying marks, a small round plate was found with numbers on it. Some
research of Zenith carburetor markings gave meaning to the numbers as follows:
Zenith Type 1510MV
Part Number S 655
Customer A84 234-1
July 2012
After much head scratching and soul-searching, the decision was made to acquire
BOTH complete LeRoi V8 engines and transport them to Chandler. If all goes well,
the engines are expected to be in Chandler by early August.
May 2012
The locomotive was open for National Train Day, but the cab was roped-off due to
the clutter of engine parts in the cab.
March –April 2012
All four of the engine’s valve covers were stripped to bare metal, primer
painted, and painted.
As a possible ‘Plan B’, the owner of the Texas engines was contacted to see if
he would be agreeable to removal of parts from the engine, for the same price,
as an alternative to acquiring and transporting the whole engine. He was ok with
that idea.
February 18, 2012
The gear cover and eccentric were successfully removed. Inspection of the gear
train did not reveal any collateral damage or extreme wear.
January 04, 2012
With the aid of a homemade ‘jacking tool’, the eccentric crank was finally
loosened from the crankshaft. The gear cover is still in place: removal will
come later with the help of the forklift.
After much deliberation, the decision was made to purchase one of two LeRoi
engines located in Temple Texas. The engines are stationary types previously
used to power cotton gins. They are for sale by a private owner for $350 each.
The plan is to use one of the flat gear covers to replace the extended gear
cover on the Plymouth.
December 2011
Some new history on the locomotive has been obtained! Plymouth Locomotive Serial
Number 4463 was purchased by the War Department on March 26 1943, and was
stationed at the Army Air Corp’s Victorville Advanced Flying School, in
Victorville CA, as US Army #7595. The assignment lasted from the time of its
original purchase until being sold to private company M. Lummis & Co of Richmond
CA in November 1966. It was later owned by Pacific Railroad Contractors of
Torrance CA, and finally Railroad Builders of Mira Loma CA before being donated
to the museum in 1988. The LeRoi RXIV engine is rated at 250 HP.
Memo: 4463 3/26/1943 Std MKW-2 LeRoi RXIV 250hp B 30T G/M
October 29, 2011
Made some measurements around the crankshaft extension, with a view towards
making a tool that will help push the extension off the main crankshaft.
Bolt: 12 TPI, 1.370” over threads, 1.125” long
Gap between counterweight faces: 3.50”
October 23, 2011
Sent letters of inquiry to:
Lisle Surplus, who currently lists for sale a pair LeRoi V12 engines that could
be a potential source of parts;
Belton, Grandview & Kansas City Railroad, reported to have a derelict Plymouth
on the property, of unknown model number or engine type.
New York Museum of Transportation, following up on a previous inquiry about
LeRoi V8 engines on their property.
October 22, 2011
Attempted to remove the damaged front casting, but with no luck. The casting is
now loose, but since we are also trying to remove the crankshaft extension along
with it, the shaft connection is still holding it onto the main crankshaft.
Transferred all the removed parts to pallets, except for the radiator, which
will require the forklift. Eventually all the parts will be moved to the bullpen
for temporary storage as work on the engine continues.
Secured caps over the two upward-facing coolant pipes, and placed a tarp over
the front of the engine to keep out dirt and rain.
October 21, 2011
Cleaned and primer-painted the upper hood support rails. Delivered a
specially-made extra-wide pallet for the hood section.
October 15, 2011
Continued with disassembly of the engine compartment: removed the two large
handrails along the side of the hood; two smaller angled handrails at the sides
of the radiator; front section of the hood; both forward side doors w/corner
supports; and the radiator.
September 04, 2011
Visited the Rochester & Genesee Valley RR Museum and the New York Transportation
Museum in Rush, New York. Discovered there one Leroi V8 engine, removed from
their Plymouth locomotive and mostly disassembled, and another Leroi V8 power
unit that was removed from a snow blower. The snow blower engine does not have
the compressor option. Sent a letter of inquiry to the museums asking about the
possibility of a sale or donation of the front casting from one of those engines
to repair our engine.
August 20, 2011
Drilled out the two remaining hood bolts that were too rusted to remove by any
other means. The rust and crud between the hood and its supporting members was
broken free, so the hood is now loose and ready to remove.
July 16, 2011
Removed the majority of the bolts securing the front section of the engine hood.
Most were so rusted they broke off with little effort, and were easily removed.
However, two of the bolts could not be removed from the holes after they broke
off. For safety reasons, temporarily replaced two of the hood bolts that also
secure the handrails.
July 02, 2011
Continued with disassembly of the engine. Removed the generator bracket, remains
of the connecting rod, the compressor’s water and output pipes, lower radiator
hoses, and the bolt attaching the crankshaft extension to the main crankshaft.
By disconnecting the crankshaft extension, it is hoped that the extension and
fan pulleys will come off with the casting – because otherwise there is
insufficient clearance to remove the pulleys before removing the casting. Began
loosening the bolts securing the damaged front casting.
June 25, 2011
Began disassembly of the front of the engine. Drained the radiator, disconnected
the compressor’s output pipe and the water connection, removed the ignition
coils, generator, upper radiator hoses, compressor air cleaner, compressor, fan
assembly, and fan belts.
May 16, 2011
Sent a letter to Delaware Coast Line RR, regarding the out-of-service Plymouth
locomotive (with LeRoi V8 gas engine) reported to be on their property, asking
about the possibility of sale or donation of parts or the entire locomotive.
May 07, 2011
National Train Day! The cab and engine doors were opened for public inspection,
and visitors were welcomed into the cab. A donation box was set-up for the
locomotive, which yielded $138 in donations. Idea for next year’s donation box
sign: “Suggested Donation $1”.
An evaporation cooler was placed blowing into the cab, which made it more
hospitable on the hot day.
May 06, 2011
Washed interior of the cab and hosed-off the exterior of the locomotive in
preparation for National Train Day. Positioned the locomotive at the north end
of track #2.
April 23, 2011
Installed the new bell-ringer mechanism in the repainted bell, and mounted the
assembly to the locomotive. Although prior testing proved that the new ringer is
working properly, the bell could not be tested on-locomotive due to the damaged
air system.
April 17, 2011
By opening the top lid of the air compressor, it was evident that the exhaust
valve failed, which caused the valve to fall down into the compressor cylinder,
jamming the piston and breaking the connecting rod. The broken rod whipped
around and shattered the huge cast iron piece on the front of the engine. This
casting 1) covers the timing gears, 2) supports the bearings for the crankshaft
extension that powers the compressor, 3) supports the compressor body, and 4)
supports the fan shaft. It no longer performs any of these functions. Since the
fan shaft was no longer supported, the fan tipped forward and sliced into the
radiator, destroying most of the core sections. This was the source of the
leaking coolant.
Needless to say, the locomotive has been rendered inoperable. Several options
exist for repairing the locomotive, including rebuilding the existing engine, or
replacing it with a more modern diesel engine.
April 16, 2011
While performing routine switching in the yard, a drop in air pressure was
noted, quickly followed by a horrible crashing and banging noise from the engine
compartment. The engine was immediately shut down. Several chunks of cast iron
were laying on the ground beneath the front of the engine, and the air
compressor’s broken connecting rod was seen hanging down. A large amount of
coolant was leaking.
March 26, 2011
Started the locomotive and used it to pull out the Baldwin in preparation for
starting. No problems observed.
February 18, 2011
Added 32 gallons of fuel, plus octane booster and fuel stabilizer. Also changed
out the fuel in the ‘emergency’ 5-gallon can. Fuel level after addition was 38
gallons.
August 14, 2010
The locomotive was started and operated with no problems observed.
July 10, 2010
Added $100 worth of gasoline to the fuel tank.
July 3, 2010
The locomotive was started and operated, with running out of fuel the only
problem experienced. Good thing we keep a 5-gallon back-up can in the cab.
June 05, 2010
Drained the crankcase, replaced the drain valve, and filled the crankcase with
SAE 30 non-detergent oil. Replaced the two oil filters. The old oil, while
dirty, was not nearly as bad as the oil that was drained out on the last oil
change several years ago. Started the engine after the oil change, and noted a
few minor oil leaks at the fittings on the small oil lines.
After checking with Pittsburgh Air Brake, discovered that the gasket for the
self-lapping unit is correct. It just didn’t look right (from the outside) since
the gaskets fits in between the studs, rather than around the studs as with most
gaskets. The new gasket still needs installation.
May 08, 2010
National Train Day! The Plymouth performed well, hauling a caboose full of happy
passengers. Started running at 10:00 AM, didn’t stop until 1:15 PM, rested for
45 minutes, and then resumed running from 2:00 PM until 3:30 PM. Ran from the
crossing up the derail at the north end of the yard. No overheating like last
year. The bell started acting oddly after about 2 hours: must investigate.
May 01, 2010
Added one quart of oil to the crankcase, and another ½-gallon of antifreeze to
the radiator.
Washed the interior of the cab. Tested the automatic brake system on the
locomotive and the caboose.
April 30, 2010
Installed a new pipe bracket gasket (Wabco p/n 92428) on the SA-2 Independent
Brake Valve. The old gasket was very brittle and cracked. Also attempted to
replace the gasket for the Self-Lapping Unit, but the gasket ordered was the
wrong type. Evidently we have a variation or modification of the SA-2 valve not
documented in the Wabco literature we have. Must investigate further, but for
now, the old gasket seems to be holding okay.
In preparation for National Train Day, the Plymouth was used to pull the Baldwin
into position for horn-blowing (i.e. away from other display equipment) and to
pull-out the caboose for train rides.
April 29, 2010
Washed the exterior of the locomotive, and installed new wood for the front and
rear footboards.
Purchased 48 quarts of SAE 30, Type SB non-detergent motor oil (40 quarts for
the crankcase, and another eight quarts for future replenishment). However, it
was decided to wait a few weeks before changing the oil and filters, since we
also want to replace the oil pan drain valve at the same time.
April 17, 2010
Added about ½-gallon of antifreeze to the radiator, but more is needed. Since
only plain water has been added to the radiator in recent times, the next few
additions will be pure antifreeze to restore the proper concentration. This may
help with the boiling-over problem.
Changed the fuel filter, NAPA 4347. Also purchased two replacement oil filters
(NAPA 1503), but installation will wait until we do the oil change.
April 10, 2010
Greased many zirc fittings, oiled moving parts, and replenished the cups on the
water pumps with marine grease. Added 33 gallons of gasoline, and added a
corresponding amount of octane booster and stabilizer to the fuel.
Checked the battery water, but less than two cups of water was necessary to
replenish the three batteries.
January 31, 2010
Gave caboose and cab rides for the Annual Membership Meeting & Picnic. Consumed
about 6 gallons of fuel.
January 30, 2010
Added 3 quarts of oil to the crankcase and about a gallon of water to the
radiator. The handle fell off the crankcase drain when I attempted to drain the
crankcase condensation. The handle was put back on (actually found the screw in
the ballast!), but this valve should probably be replaced on the next oil
change.
Pulled out the ‘714 caboose and parked the train just north of the crossing, in
preparation for the next day’s meeting. Hosed and wiped down the cab interior,
and hosed the undercarriage.
January 24, 2010
Reinstalled all the components of the air compressor. Started the engine, and
the air pressure ran up to 110 lbs at which time the unloader valve functioned
as intended. Pressure dropped to 90 lbs and then the compressor loaded again.
This is the best air pressure we have had in many years. The previous maximum of
only 70-80 lbs was caused by the gradually eroding valve seat on the old
compressor exhaust valve.
The higher air pressure did wonders for the sound of the bell: now it goes DING
DING instead of dink dink.
Observed that the fuel level was down to about 3 gallons. Over the following
week, added five gallons at a time until the level was about 18 gallons, plus
another 5 gallons ‘emergency’ fuel in the gas can.
January 16, 2010
Installed a new battery in the #1 starting position. Received a $60 credit on
the old battery, despite having no receipt. Thanks Manny Moe and Jack!
Created a new gasket for the compressor cover using a graphite-bearing high
temperature material.
Received the new air compressor exhaust valve assembly from Waltek Industries.
Looks marvelous! Installed a new 3/8”-24 stud in the bottom half, and welded it
in place.
Received new exhaust valve springs from WC Machine.
Re-assembled the exhaust valve, using three springs facing in the same
direction. Secured the assembly with a special Norlok lockwasher and a two-piece
locking nut (for $17 each it’d better hold!)
January 09, 2010
Removed the #1 starting battery, in preparation for replacement. Topped-off the
water in the other two batteries.
Removed the air compressor cover, so a new gasket can be traced.
January 02, 2010
Verified that the suspect battery was #1 starting battery (installed September
2007). Connected the large battery charger to it, and immediately noticed a
strong ‘rotten eggs’ odor. Not wanting to risk an acid boil-over or fire under
the hood, attempts to charge the battery were discontinued. The bad battery was
disconnected so that the trickle-charger could work on the other two good
batteries. A later search of the internet yielded the confirmation that the
rotten eggs odor is a definite sign of a bad battery.
Replaced the bulb on the trickle charger, as it had failed due to the large
voltage drop in attempting charge the bad battery.
December 30, 2009
Temporarily re-installed the air compressor cover so that the engine could be
started.
Started the engine and ran it for about 15 minutes. The cab voltmeter indicated
a very low voltage on one of the batteries.
December 19, 2009
Cleaned and painted the sandbox cover gloss black.
December 12, 2009
Cleaned and painted the exhaust stack gloss black. Used rubbing compound to
remove the rust stains below the radiator fill, caused by boil-overs.
Completed the design for a functional replacement for the exhaust valve
assembly: the original part was a machined casting, whereas the new one would be
machined from a steel blank. Ordered one set from Waltek Industries (a local
machinist).
Measured the old exhaust valve springs and made a drawing. Ordered 20 pcs from
WC Machine (another local machinist).
October 10, 2009
Disassembled the air compressor, and found a ruined-beyond-repair exhaust valve
assembly. The knocking sound was caused by the exhaust valve’s stud working
loose in a downward direction and hitting the top of the piston. This in turn
bowed the exhaust valve upward so that the valve seat was no longer flat.
October 3, 2009
Started the engine in preparation for some switching, but the air compressor
began making a knocking sound and quickly failed. Some complicated maneuvers
with the Switchmaster got the Plymouth back to its parking spot.
August 15, 2009
Completed the switching in the yard. The engine got very hot, but the work was
completed before it boiled over.
August 14, 2009
Added three quarts of oil to the crankcase and about 1 gallon of water to the
radiator. As the Baldwin failed to start, we used the Plymouth for extensive
switching in the yard. The engine overheated after a particularly hard pull (the
steam engine, diesel crane and two flatcars!), so it was shut down and allowed
to cool. Another session of switching followed after about an hour and some
added water.
Also observed, twice while pulling a heavy load in 1st gear, the gear shift
lever vibrated out of position and the transmission de-coupled. This was
observed once before on another occasion. A well placed boot keeps the lever in
position under these operating conditions. (Now I know what to do with my
previously unused left foot!)
July 18, 2009
Added one quart of oil to the crankcase and about ¾ gallons of water to the
radiator. Started the engine and used the locomotive to pull out the Baldwin in
preparation for starting.
May 09, 2009
For National Train Day, the locomotive performed well pulling two cabooses,
giving train rides to hundreds of families. We did have to let it cool down a
few times due to overheating, and in fact it boiled-over as soon as the engine
was shut down. Had some trouble re-starting the engine at one point – plenty of
cranking but not even a cough. It was finally coaxed into started by opening the
throttle almost all the way. This has happened before, and is probably a
vapor-lock situation due to the very hot engine. The engine temperature reached
nearly 200 degrees F, with the oil pressure dropping considerably due to
thinning of the oil. Ambient temperature was over 100 degrees, which didn’t help
matters.
Thirteen gallons of fuel were used for the train rides. Based on the number of
trips and the length of the run, this works out to about 0.4 miles per gallon.
What a gas hog! Tank measured 40 gallons.
May 08, 2009
Reassembled and tested the air compressor. Air pressure quickly climbed to 75
PSI, which is about as much as we get with the broken valve seat.
Dave Luca gave a polish to some of the plastic cab windows and rubbed-out some
rust streaks below the cab windows. Dave also talked to our Window Crew about
replacing some of the windows with glass as material becomes available from
other projects. The rear louver-window adjuster was repaired by tightening the
bracket and replacing the missing thumbscrew.
Washed the locomotive, inside & out. The cab interior was dirtier than the
exterior!
May 03, 2009
Removed the valve cover on the air compressor and found that the exhaust valve
assembly had come apart, with the flapper ring and springs shattered. This time
the bolt hole was too damaged to reuse, so a larger-sized helicoil (7/16-14) was
installed to refurbish the threads. A new copper gasket was installed underneath
the exhaust valve. The valve was reassembled with the new, larger hardware,
using high temperature thread-locker, and special Norlok washers.
As the exhaust valve has been a continuing issue, and part of the valve seat is
broken away, a drawing was made of the cast metal valve base, in case we decide
to fabricate a new one in the future. Research continues to determine the
manufacturer of the air compressor – the logo on it does not look like a LeRoi
mark.
May 02, 2009
Added 50-gallons of fuel, plus fuel stabilizer and octane booster. Tank measured
58 gallons (*).
(*) A chart was developed to relate the inches of fuel to gallons. A wooden
stick is inserted from the top of the fuel tank down to the bottom, and the wet
mark is measured. The chart converts the inches to gallons. This is the first
time we’ve been able to accurately gauge remaining fuel as well as consumption
rate.
Performed some switching to get the two cabooses out for next week’s National
Train Day. Only 30-40 PSI was obtained in the main reservoir, so the compressor
has probably failed…again. Used approximately 5 gallons of fuel, mainly due to
the heavy load of pulling the Baldwin out of the way.
January 31, 2009
Rigged up the temporary switches again on the ignition coils, and attempted to
adjust each distributor independently. Although a change in the engine’s
performance could be made, no amount of adjustment would improve the backfiring.
Just different, but not better.
Next removed the valve covers on the right bank, and discovered that one of the
pushrods in #2 cylinder was out of proper position (i.e. not in contact with the
rocker arm). The pushrod was put back into place with hand pressure, but no
loosening or mis-adjustment of the rocker arm could be detected. The suspicion
is that the pushrod was pushed out of position by a large backfire, but there is
no telling how long it has been that way.
Barred over the engine by hand, and also with the starter motor: the pushrod
held and operated the valve as intended.
Started the engine again, and it ran somewhat differently (how could it not, now
that all valves are working?) However, no time was left to experiment further
with adjusting the distributors. To be continued…
January 25, 2009
This was the day of our 2009 Annual Picnic and Membership Meeting. The big event
was using the Plymouth to pull the 405 Supervisor’s Car several times back n’
forth the entire length of the museum’s tracks, with a full load of passengers.
A good time was had by all, except for yours truly, who was in hogger-heaven!
January 24, 2009
For the generator, the repair shop installed new brushes, bearings and did a
thorough cleaning and painting of the housing. Installed the regulator and
rebuilt generator, and noted that the system produced a positive voltage, and
that the batteries were charging with the engine running. No doubt the repair
shop did something else to the generator to reverse its polarity, as the brushes
and bearings were probably not responsible. Nevertheless, all the work done to
it was probably well overdue.
Added 2 quarts of oil to the crankcase, and 1 gallon of water to the radiator.
January 17, 2009
Attempted to ‘shock’ the generator into reversing its polarity, by briefly
connecting the positive battery terminal to the field winding. This was tried
several times, but the generator continued to produce a negative voltage. The
generator and regulator were removed, to have them checked out at a local
automotive electrical shop. Later research revealed that we should have been
‘shocking’ the armature winding, not the field winding.
From our friends in Wichita, we learned that they are currently using only one
distributor on their Plymouth, and it is running very well that way (their video
on YouTube confirms this). Apparently, dual ignition systems like this were, at
least in some applications, meant as a back-up, and not necessarily intended to
run simultaneously. The LeRoi documentation we have discusses dual ignition
systems, but says little about its application or use, except to say that if
both systems are used, the spark from each must occur simultaneously.
As an experiment, some temporary switches were rigged up to control the 12-volt
feed to each coil. With the engine running, each distributor in turn was
disabled to see its effect on the engine’s performance. With one of the ignition
systems running, very little difference was observed. With the other system
running, the backfiring increased somewhat. Certainly, more work on the ignition
system is needed, but this brief experiment does show that the engine does not
necessarily need both distributors.
January 10, 2009
Found the receipt for the battery, and got a no-charge replacement, as it was
still under full warranty. Installed the new battery, and noted that the trickle
charger was charging all three batteries. The engine started easily
However, with the engine running, it was noted that the batteries were not
charging. This was traced to the fact that the generator was producing a
negative voltage. Fortunately, this condition does no harm, as the isolation
diodes prevent any reverse current. It just means the batteries are not charging
from the generator, which is not a good situation for any length of time.
January 03, 2009
The trickle charger did not bring up the charge on #2 starting battery: in fact,
the voltage was actually lower than before. Connected the big battery charger
for about an hour on its lowest setting, but this also made no improvement on
the battery’s charge: the only result was the battery getting quite warm. Tested
each cell of the battery with the hydrometer: five of the six cells tested from
very weak to bad. Also noted that the fluid in several of the cells was
rusty-colored. Conclusion: battery is bad, probably from the bad charging that
it has experienced lately.
Removed #2 starting battery from the circuit so that the trickle charger will
charge the remaining two batteries. Began the search for the original receipt,
so that a credit can be obtained on a replacement battery.
December 30, 2008
Topped-off all three batteries with distilled water. Set-up the big battery
charger on #2 battery, which was drained down to about 6-volts. Charging for 2
hours got the voltage up to about 10-volts.
Cleaned the battery cable clamps, and coated all surfaces of the clamps and
battery terminals with silicone dielectric grease. Re-installed the batteries.
Installed numerous nylon cable-ties on both new and existing wiring.
Turned on the built-in trickle charger, and observed that #2 battery was
charging. It remains to be seen if several days of trickle charging will be
enough to bring the battery up to full charge.
December 29, 2008
Fabricated a new plywood bottom for the battery tray and treated it with
Thompson’s Water Seal. Scraped the rust and corrosion from the battery tray’s
frame, and installed the new wood.
Installed the new wiring for the battery isolator. Used colored heatshrink
tubing on the wires to color-code them for ease of future troubleshooting. Used
the old diode mounting holes to pass the output wires through the electrical
panel. Nylon shoulder-washers were glued into the holes to protect the wires
from abrasion.
Scrubbed the outside of the batteries with plain water.
December 27, 2008
Received the new battery isolator. Removed the three batteries to make way for
reworking the charging system. Removed the old diodes and associated wiring.
Drilled mounting holes and installed the new battery isolator on the rear
surface of the electrical panel.
The plywood bottom of the battery tray is severely rotted, so this is the ideal
opportunity to replace it with a new piece.
December 13, 2008
Fabricated and painted new ignition coil mounting plates. Installed the new
plates on the engine and mounted the ignition coils using the new U-bolt clamps.
December 06, 2008
Removed the two mounting plates for the ignition coils, and scraped the crud
from the surrounding area on the engine. The idea was to drill an additional
hole in these plates for the new U-bolts, and then clean and paint them.
However, as cleaning of the plates progressed, it was discovered that both of
them were cracked. So, new plates will be fabricated: they will include all of
the original holes in case the old ignition coils are ever re-mounted.
November 29, 2008
Replaced the gasket on the fuel tank filler. The old cork gasket was rotted and
leaked fuel when the tank was full. The new gasket is neoprene rubber.
Measured for a clamp to secure the new ignition coils. Found a saddle-type
U-bolt clamp at McMaster-Carr p/n 3042T91. Mounting the clamps will require
modification of the mounting plates on the engine, as the existing holes are not
the correct spacing.
Ordered a new battery isolator to replace the existing discrete diodes in the
charging system, Sure Power Model 1203 (120 amp for three batteries). This unit
has its diodes mounted on an electrically isolated heatsink, which should
eliminate the overheating and insulation-failure problems of the existing
arrangement.
November 22, 2008
Replaced both ignition coils with ones matching the Chevy distributors, in the
hopes this would improve the backfiring. Unfortunately, the new coils made no
difference in the performance of the engine. The coils are temporarily mounted
with cable ties – a permanent mounting method will be devised.
November 15, 2008
Engine would not crank. A quick jump start with the battery charger got it
running. Used the locomotive to pull-out the Baldwin in preparation for
starting.
The pilot lamp on the built-in battery charger was burned-out before starting
the engine. After replacing the bulb and starting the engine, the lamp was lit.
It should not be lit when the engine is running. Both of the symptoms are the
same as on a previous occasion when one of the battery isolation diodes went
bad. We probably have another failed diode.
November 01, 2008
Added 2 quarts of lube oil to the crankcase, and one gallon of water to the
radiator. Started the engine, and exercised the locomotive up and down the
tracks. All systems ok.
Made email contact with folks at the Great Plains Transportation Museum in
Wichita Kansas, who also have a Plymouth ML-8 with Leroi RX1V engine. Also heard
via email from the Kelly’s Switch Society in Woodville Wisconsin who are trying
to get theirs running. They are looking for parts for the original Delco
dual-point distributors and we will sell them our old distributors (with full
disclosure of their condition). Also found out that there is another Plymouth
with LeRoi engine running at the Passumpsic Railroad in Barnet, VT, but have not
made contact with them.
After many years of no contact with anyone else having a Leroi-equipped ML-8, it
was very nice to make contact with these groups who are facing similar problems
– as they say, ”misery loves company”.
August 2, 2008
Re-tightened the hold-down screws on the air compressor intake and exhaust
valves: the new copper crush washers had settled a bit after running the engine.
Used the locomotive to move the steam engine back to its parking spot, after
completion of the cowgirl photo shoot.
July 26, 2008
Added 1 quart of lube oil, topped-off the radiator, and rotated the
grease-injection cups on the water pump. Used the locomotive to move the steam
engine out to the lead in preparation for a photo shoot for the Cowgirls
Historical Society.
July 12, 2008
Re-assembled the components of the air compressor, with all new parts fitting
well. Started the engine and got up to 110 PSI on the main reservoir –
compressor is fixed! Ran the locomotive up and down the track a few times –
everything ok. Should probably check the tightness of the compressor’s valve
hold-downs before operating again.
June 21, 2008
Located replacement copper sealing rings for the intake and exhaust valves.
Known as ‘copper crush port gaskets’, they are made of copper wrapped around an
asbestos-like material. Found the exact size needed at www.restorationstuff.com,
part number GAS034, 2-3/4” ID x 3” OD.
Located replacements for all nuts, washers and set-screws needed to re-assemble
the compressor. Most were badly rusted and/or had damaged threads.
June 14, 2008
Located a replacement leather cup washer for the unloader piston: not an easy
item to find! Part is for a Pista-brand bicycle floor pump, part number 73.1.
After soaking the washer in neetsfoot oil, it appears it will work okay.
Repaired the broken section of the exhaust valve seat, using Devcon steel putty.
June 07, 2008
Opened cover plate on air compressor – what a mess! Found five problems that all
likely contribute to the low air pressure. In fact, it is amazing that we got as
much as 35 PSI from the system.
1) The valve plate and springs on the exhaust valve are broken. Fortunately,
replacements are on-hand.
2) The leather cup washer on the unloader-piston is completely worn away. A new
one will have to be obtained or fabricated.
3) The copper sealing ring for the exhaust valve assembly is nearly gone. A new
one will have to be fabricated.
4) A small section of the valve seat on the exhaust valve assembly is broken
away. Being a cast-iron part, repair may be difficult.
5) The bolt holding together the exhaust valve assembly is worn and needs
replacement. The locknut on the current bolt is too short to get a good wrench
grip on it. A taller nut or standoff will be used.
Additionally, it is suspected that the compressor valves may have been
improperly re-assembled on the last rebuild. The valve assembly hold-down cages
may not have been fully tightened, allowing the valve assemblies to bounce up
and down, possibly contributing to some of the above problems. This will be
addressed when re-assembling the valves.
May 31, 2008
Checked battery water – all okay (new batteries).
May 03, 2008
Started the engine, but observed that main reservoir would not go over 35 PSI.
Used the locomotive to pull the Baldwin away from the other equipment.
Started the engine again to return it to its parking spot – still observing low
air pressure. Will need to investigate that – the compressor probably needs
attention again.
April 05, 2008
Started the engine and exercised the locomotive up and down the track. All
systems okay.
March 15, 2008
Replaced the ignition battery w/Energizer #56-550E, Group Size 56. Also replaced
the entire negative battery cable (24” - 4 GA) and the positive battery clamp.
Engine starts fine now, and ran the locomotive up and down the tracks.
March 08, 2008
Removed the dead ignition battery, and cleaned-up the battery tray.
March 01, 2008
Moved the Baldwin and The Federal after arrival of the new dome car. Jump
started the still-dead ignition battery to get it started.
February 23, 2008
Started the engine and exercised the locomotive up & down the track. Jump
started the still-dead ignition battery to get it started.
January 27, 2008
On attempting to start the engine, it was discovered that the ignition battery
was dead. A quick hook-up of the battery charger got it started. Despite the
rain, performed several yard-length runs with two cabooses filled with museum
members.
January 26, 2008
Moved locomotive and cabooses in preparation for tomorrow’s Annual Membership
Meeting.
January 19, 2008
Moved the accumulated ‘junk’ from the cab to either a trash can or the “motive
power storage locker”, aka the concrete phone booth. Also vacuumed the cab’s
interior in preparation for upcoming Membership Meeting. Removed the old acrylic
protective covers on both headlights: both were quite clouded with age, and were
no longer required in our now more-secure location.
October 6, 2007
Started the engine and ran locomotive up and down the tracks.
September 15, 2007
Replaced both starting batteries: engine now starts fine. Added 1 gallon water
to radiator. Exercised engine in yard.
August 08, 2007
Added 50 gallons fuel, plus octane booster and fuel stabilizer. Batteries
required charging before starting – they are getting very weak now.
Performed switching to move bulkhead flatcar to track 6 for loading of
miscellaneous junk.
July 14, 2007
Good news today! Charged each of the two starting batteries for about 1-1/2
hours each (using the 40-amp setting on the charger), and the engine started
easily. Ran the engine for about ½ hour.
July 07, 2007
Greased water pump bearings (4 places).
Attempted to start the engine, but the batteries were very weak. Ran out of time
to find the battery charger or investigate further. (Batteries are several years
old and likely need replacement.)
June 30, 2007
Started the engine and ran the locomotive up and down the track.
June 23, 2007
Topped-off batteries with distilled water.
Topped-off radiator with plain water.
June 02, 2007
Drained crankcase and replaced with 20W-50 oil (40 qts).
Drained oil filter canisters – considerable water and sludge had accumulated.
Draining these canisters should be added to the list of periodic maintenance
tasks.
Replaced oil filters (2) with NAPA 1503.
Replaced fuel filter with NAPA 4347.
Started engine, and observed higher oil pressure than before (that’s a good
thing).
May 26, 2007
Replaced missing screw/nut on window frame, and tightened all others (all were
loose).
April 30, 2007
Performed extensive switching to rearrange display equipment.
The radiator boiled-over about half way through the switching work. After
waiting for the engine to cool, switching resumed at a somewhat slower pace to
avoid overheating.
April 21, 2007
Fired up the engine and gave some cab rides for some family members of an old
museum friend. Received a $90 donation for the Plymouth project.
April 14, 2007
Cleaned corrosion from the ignition battery terminals and the adjacent
electrical bulkhead.
Replaced the wires from the battery charger.
Replaced the wires from the ignition battery to the ignition relay. Old wires
were too short to allow the battery to sit straight in the tray.
Placed wood strips between and around each of the three batteries. This will
keep the batteries safely spaced from each other, and prevent the batteries from
shifting in the tray.
April 07, 2007
Completed painting of the inside of the engine compartment doors. Added 1/16”
thick closed-cell foam gasket around the door edges to reduce vibration noise
caused by the doors rattling against the hood.
April 06, 2007
Washed the inside of the engine compartment doors in preparation for final
painting.
February 05, 2007
Added 5-quarts of lube oil, approx ½ gallon of battery water, and 1-1/2 gallons
to radiator water.
August 21, 2006
Used the locomotive to re-arrange some of the cars for better display purposes
(specifically, putting all the cabooses together).
Parked the Plymouth in its designated spot (near the electrical outlet for the
battery charger).
August 12, 2006
Added 2 quarts of oil to crankcase. Numerous small leaks are beginning to add
up, especially with all the hard running lately.
The final trip to Tumbleweed was made, with the Plymouth in tow behind the
string of passenger cars. Locomotive was running (but not under power) for the
trip, so full advantage was taken of the opportunity to celebrate our final
departure with much ringing of the bell, blowing of the horn and sounding of the
whistle. Upon arrival at the new location, the locomotive pushed the entire
string of cars into the yard. New home at last!
Two speeders followed behind on this last trip, which made for quite a sight on
the rails!
August 11, 2006
Used the locomotive to re-arrange and set-up a string of cars in preparation for
the last load to be taken to Tumbleweed.
August 09, 2006
Used the locomotive to re-arrange and set-up a string of cars in preparation for
the next-to-last load to be taken to Tumbleweed.
August 07, 2006
Used the locomotive to re-arrange and set-up a string of cars in preparation for
the next load to be taken to Tumbleweed.
August 05, 2006
Added 4 quarts of 30W oil to crankcase, plus 2 bottles of STP Oil Treatment.
Checked oil in transmission (2 separate compartments). Both appeared to be full
(in fact, somewhat over-full).
Moved cars to allow speeders to be moved from end of track #4.
July 30, 2006
Added 2 quarts of 30W oil to engine crankcase. Used the last of the oil on-hand:
still needs more oil.
Moved cars around to set-up museum’s calendar photo shoot: three platform
passenger cars in a row.
July 29, 2006
Moved cars around to help with removal of utilities along Track #1.
Added 50 gallons fuel, octane booster, and fuel stabilizer. A
new gasket for the M-3 Feed Valve was received.
Pulled out a string of five cars to facilitate adding diesel fuel to the dining
car.
Fuel low – added about 4 gallons from Emergency Can, plus
another 5 gallons purchased. Must fill tank before next operating session.
Performed more switching to put out three tank cars and a caboose, for the third
load moving to Tumbleweed Park. Performed set-n-release brake tests on the
outgoing cars.
A new gasket for the M-3 Feed Valve could not be obtained in
time, so a temporary fix was done with Loctite 5699 Silicon Gasket Maker. As the
old gasket had only a small rip in it, this seems to be holding ok. A new gasket
is on order (Wabtec #81006).
Used the Plymouth to move the steam engine for the first time in several years.
It wasn't too hard to get it started and moving down the straight track, but the
Plymouth lost traction in the middle of the tight curve on Track 3. With much
sanding, throttle and clutch fiddling, spinning of wheels and stalling of
engine, the Plymouth finally got the steam engine moving and past the curve.
Whew!
Performed extensive switching to reposition equipment onto
track #4, for the second load moving to Tumbleweed Park.
Performed set-n-release brake tests on the outgoing cars. Shortly afterward, the
cover gasket on Westinghouse M-3 Feed Valve blew (part of the brake system),
causing a major air leak. This must be fixed before the next operating session.
Performed switching for the Jane Marie and the Vista Canyon, returning from a charter trip on the Apache Railway.
Re-installed engine compartment door latches. Despite valiant
efforts, painting of engine compartment doors is still not complete. Weather has
become too hot, so painting will resume in a few months.
Obtained 1/16” thick x ½” wide foam gasket for use around the door edges. This
will prevent metal-to-metal rubbing and damage to the painted surfaces.
Checked and re-filled batteries, and checked and re-filled radiator.
More brush painting of engine compartment doors. Painted rods for the door latches.
More brush painting of engine compartment doors. Completed first coat on all areas, but a second coat is required.
Continued with brush painting of engine compartment doors.
Applied the final gray paint (Rustoleum Gloss Smoke Grey) with a roller to the flat areas of the inside of the engine compartment doors. Two coats were required.
Finally removed the two stubborn latches on the engine compartment doors. Cleaned the latches, reconditioned the damaged threads, and found new stainless hardware for the rod connections. Sanded the old paint and rust from the latch rods, and applied a primer coat.
Used the locomotive to swap positions of the Baldwin and the Federal, to facilitate air conditioner work on the car.
Finished brush work for the primer coat.
Started applying the primer coat with a brush on door edges, louvers, etc.
Applied the primer coat with a roller to the flat areas of the inside of the engine compartment doors (Rustoleum Primer for Rusty Metal).
Finished preparing doors for painting. Applied degreaser, and washed and rinsed doors to prepare for painting.
Continued with paint and rust removal on the engine doors.
Scraped, wire brushed and sanded the inside of the engine compartment doors to remove rust and loose paint in preparation for painting. Removed all the door latch rods, and latches from the fireman’s side. The latches on the engineer’s side proved stubborn, to be left for another day.
Added 50 gallons fuel, octane booster, and fuel stabilizer.
Used the locomotive to put out the Jane Marie and Vista Canyon for pick up by the UP, for the purpose of a charter trip on the Arizona Eastern RR.
“Boeing Day” volunteer assisted with scrapping paint and rust from the inside top of the engine compartment. Thanks Carlos!
Used the locomotive to pull out the Baldwin for starting. Had a visit from Ken Keyer (BNSF Engineer) for a lesson in the use of the E6 Train Brake Valve.
Added 2 quarts 30W oil to engine crankcase.
Pushed Amtrak-certified cars back together again after completion of annual Amtrak inspection.
Separated Amtrak-certified cars in preparation for their annual Amtrak inspection. Pulling 7 cars at once was tricky!
Topped-off water in batteries. Pulled the Desert Valley out to the crossing for the Chick-Fil-A calendar photo shoot.
Performed extensive switching to position flatcar in front of C45 crane. This will facilitate lowering the crane’s boom in preparation for the move to Tumbleweed.
Repaired air line for the compressor unloader valve. It appeared that the flare on the copper tubing was not sufficient, and the tubing worked loose. Started engine and verified proper operation of the compressor.
Noted oil leaking around #1 cylinder outside sparkplug. Tightened sparkplug.
Moved Plymouth and Baldwin out for display for the Annual Membership Meeting. Air line for compressor unloader valve popped out of the fitting on the compressor end.
Moved Plymouth out into the yard for washing, in preparation for next day’s meeting.
Moved Baldwin out into the yard for more washing.
Moved Diablo Canyon out into the yard for more painting work.
Moved Baldwin out into the yard for washing.
Moved Diablo Canyon out into the yard for painting of the
ends and trucks.
Moved Baldwin out into the yard for starting.
Completed new ARM lettering for engine hood.
Replaced and re-mounted the two remaining diodes in the
battery charging system. Repaired the cracked insulation on the battery cables
with several layers of electrical tape.
Moved radio’s power take-off from starting battery #1, to switched ignition
circuit. This avoids the possibility of leaving the radio ’on’ when the loco is
not in use.
Cleaned the fuse clips for cab voltmeter circuit (again). Poor contact continues
to be a problem.
Added 2 quarts oil to crankcase.
With expert help from Ron Schofield, the cause of the
negative generator voltage is determined to be bad insulation on the isolation
diode for the ignition battery. The diode was replaced and the thin mica washer
insulators were replaced with nylon shoulder washers. The generator output is
now positive, and the ammeter is indicating charging current. The battery
charger indicator does not light when the engine is running.
That diode had tested bad in previous troubleshooting, but was not felt to be
the cause of the immediate problem. Nevertheless, replacing the diode and its
insulator fixed the problem, even though the exact reason is still a mystery. If
the diode had been hard-shorted to the chassis, it would have drained the
ignition battery (or much worse). The mounting of the other two diodes will be
improved in a similar fashion.
Moved Vista Canyon out to the branchline for pick-up by the UP.
Continued (unsuccessfully) to troubleshoot cause of negative
output from generator.
Rearranged several cars to bring out the Vista Canyon for the San Diego charter
trip. Ignition battery voltage slowly dropped as operation continued, but
remained at an acceptable level.
Reinstalled the battery charger so that the batteries would recharge before the next use. With the generator putting out negative voltage, the engine is running strictly off the batteries, and the batteries are not recharging.
Removed battery charger to check components. Replaced
unsupported axial-lead filter capacitor with a bracket-mounted unit, replaced
the bulb, and added a 1N4006 diode in series with the output to prevent
generator backfeed. Cleaned and painted the charger enclosure.
Observation – battery charger lamp is in series with the output, and is
therefore a charging indicator, not just a power indicator. If the bulb is
burned out, no charging will occur.
Observation – measuring the voltage at the regulator output yields odd results:
approx. 13 V positive with engine off, but then approx. 14 volts negative with
engine running.
Removed non-operating roof-mounted beacon. Replaced one
burned out bulb, and oiled rotating mechanism. Unfortunately, we lacked the
proper tools to do a thorough disassembly. Reinstalled the beacon, and it seems
to work better. Yellow plastic needs replacing.
Completed wire tracing and drawing schematics. Topped-off water in batteries.
Fixed non-operating position on cab voltmeter selector switch (contacts on 3A
fuse holder were corroded). Fuseholder will require replacement at some time.
Found and reattached cover plate on left hand starter.
Cleaned sixteen sparkplugs using abrasive grit. All plugs
appeared uniformly covered with a thin layer of carbon. Some from the left bank
of cylinders smelled of fuel (not documented which ones).
Continued with tracing of wiring.
Added 2 quarts 20W-50 lube oil to crankcase.
Performed switching to place TC&GB flatcar in its final display location. Pulled the Baldwin out for its monthly starting.
TC&GB boxcar and flatcar arrived via truck, and used Plymouth to move cars into temporary position.
Pushed cars adjacent to the Vista Canyon back together, after completion of Amtrak inspection.
Began process of tracing and documenting electrical systems. Systems for charging, starting, and ignition have been documented, leaving only lighting and cab accessories to be done
Moved adjacent cars away from the Vista Canyon to allow access for Annual Amtrak Inspection.
Moved winter-visitor private car Federal into the yard, and rearranged other equipment to accommodate the Federal’s power and vestibule requirements.
Observed that the battery charger’s pilot light glows very brightly when the engine is running. This could explain why the bulb doesn’t last long. Why is this happening – bad voltage regulator?
Engine wouldn’t crank. After checking and cleaning battery cable connections (some of which need further work), it was noticed that the water was very low in the two starting batteries. With the addition of distilled water and some charging, the engine finally cranked and started. Thou shalt check battery water more often! Bad mechanic!
Filled tank with approx. 40 gallons fuel, and added fuel stabilizer. Still needs octane booster.
Moved Baldwin out for its monthly starting.
Continued with scrapping more gunk off the transmission.
Installed four new crankcase ventilators. Custom-made ventilator consists of a cylinder made of perforated steel, with several layers of aluminum mesh would inside. Entire assembly is powder-painted black –very nice!
Replaced bulb in battery charger pilot light.
Began process of scrapping gunk off the engine, starting at the transmission. This is the start of a very long process to clean up and eventually paint the engine.
Removed one of the crankcase ventilators, to design a replacement for the one (of four) that is missing. Due to the poor condition of the three remaining ventilators, all four will likely be replaced.
Used Plymouth to pull the Baldwin into the center of the yard lead, in preparation for starting the diesel.
Adjusted clutch linkage and transmission brake. Clutch pedal was active at the very top of its travel – adjusting the linkage moved the action down to the middle of the pedal travel. Transmission brake (device that stops the transmission from spinning when shifting) was apparently inoperative, making shifting difficult. Adjusting the brake now stops the transmission at the bottom of the clutch pedal travel. Overall, operating the clutch and shifting the transmission is now easier.
Replenished water in radiator and completed switching from previous day.
Performed more switching of cars upon arrival of Jane Marie. Due to high ambient temperature (110 + degrees F) and heavy cuts of cars being handled, radiator boiled over after about 1-1/2 hours. Shut down engine, with switching work not finished.
Moved locomotive to north end in preparation for arrival of Jane Marie. Andy Chinn’s turn at the throttle, with a few runs back n’ forth.
Performed extensive switching of cars due to the arrival of
the new dining car. (2 hours plus). Practiced use of sander when pulling heavy
cuts of cars.
Engine ran ok, although oil pressure was very low (red zone) by the end of the
work. With ample time to observe the air compressor controller, it did (without
intervention) regulate the pressure between 75 and 130 PSI. This indicates that
it is working, and that it merely needs adjustment to raise the low-side
cut-off.
Used Plymouth to pull the Baldwin into the center of the yard lead, in preparation for starting the diesel.
Added to fuel tank:
(2) - 15 fl. oz. Bottles of “Octane Booster”, Lucas Oil Products,
www.lucasoil.com
(1) – 16 fl. Oz. Bottle of “Sta-bil Fuel Stabilizer”, Gold Eagle Co.,
www.goldeagle.com
Added cork gasket around mounting flange of fuel filler pipe. (Fuel was sloshing out when tank is full.)
Replaced 3-3/4” ID rubber hose between air cleaner and carburetor. Moved locomotive to north end of yard in preparation for arrival of dining car.
Removed peeling AZRM lettering from left side of engine hood (Thanks, Bruce!).
Pushed Vista Canyon onto UP branch, for pick-up by waiting UP freight train.
Moved several cars (and the Baldwin!) in preparation for departure of Vista Canyon to NRHS Convention in Portland OR.
Replaced broken zirk extension tube on fan bearing.
Despite adding more grease to the axle bearings, there was still no visible squeeze-out of grease around the bearings. With almost two cartridges of grease applied to the four axle bearings, this seems to be the proverbial bottomless pit. Where is it all going?
Lifted panel on cab floor to gain access to gear ratio selection lever and linkages. Found and lubricated several more zirks. Some of the moving parts lacked zirks or oil cups, which was surprising. Lacking any other means to lubricate these parts, oil was dribbled on the joints.
Removed peeling AZRM lettering from right side of engine hood (Thanks, Bruce!).
Received adjustment instructions from Conrader Co., for the purpose of calibrating the air compressor control valve.
Put 45 gallons of gasoline in fuel tank. Ron suggested we also add a fuel preservative and an octane booster.
Located and documented many lubrication points: 12 zirk’s and 14 oil or grease cups. Judging from the amount of dirt obscuring the zirks and cups, some of them had not been touched in a very long time. There are probably still more lube points to be found. List of lubrication points (and date lubricated) will aid in the preventative maintenance of the locomotive.
Replaced faulty coil wire on right-side ignition. Fixed leak near fuel shut-off valve.
Received, installed and tested ‘new’ compressor valve. Unit properly shuts off at 125 PSI, but does not reset properly (pressure dropped below 70 PSI, at which point we manually reset the valve to preserve air brake operation). Will contact Conrader again for advice: this valve was reportedly factory-set for 100-125 PSI operation.
Changed crankcase to straight 30W oil, with 3 quarts of an STP-equivalent. Initial oil-pressure reading is now 5 PSI higher than before. Did not get engine hot enough to judge loss of oil pressure at high temperature.
Removed faulty hose between air breather and carburetor. Ordered new 3-3/4” hose.
Performed switching of cars within yard. Locomotive performed well.
Contacted Conrader Co. regarding faulty compressor control valve. They are sending their historic display unit to swap with our valve. What customer service!
Moved the newly-donated passenger car Diablo Canyon into the yard.
Engine wouldn’t start (cranked okay but no ignition). Traced problem to
defective solder connection on ‘ignition’ fuse holder on cab panel. Repaired
connection and engine started easily. Moved engine to opposite end of yard in
preparation for arrival of car.
Replaced battery charger pilot lamp (used bulb #89). No coolant leaks observed
around radiator.
Installed second new distributor. Thanks to John Mueller for doing the
machining work for the distributor modification. Engine started easily, and
ignition timing was fine-tuned. Engine ran better still.
Observed starter relay sticking. Rebuilt both relays: reattached contact plate
to plunger on one relay, and refurbished contacts on both.
Compressor controller (rebuilt by Conrader Corp.) works better than before, but
rather than the range of 100 to 125 PSI as requested, it trips out at 130 PSI,
and only reluctantly cuts back in at < 70 lbs. Controller can be cut back in
manually if necessary. Will contact Conrader to see if we can adjust this range.
After running the locomotive up and down the track several times, coolant was
observed leaking from the radiator. Suspect this was just expansion overflow
from the cap, as this was the first time engine had gotten very hot since
filling with antifreeze.
Installed quick-release on whistle pipe, to facilitate quick installation and
removal of whistle (for security purposes). However, this presented two
problems: 1) whistle is now mounted higher, and the actuator rope is at the
wrong angle, and 2) whistle can swivel on quick release, and engine vibration
will likely cause it to revolve.
The quick-release is a good idea, but still has some details to be worked out.
Ron Scofield located a suitable distributor (for a 1972 Chevrolet ½-ton
pick-up w/350 cu in V8, to be exact). He modified the drive end of the unit, and
it fit perfectly to the Leroi engine. With just one distributor firing only one
plug per cylinder, the engine started eagerly and ran better than it has in
quite a while. Not bad for only half the ignition system!
Checked all pushrods and adjusted for proper clearance.
Ron will proceed with the purchase and modification of a second distributor.
With both distributors installed and firing both plugs on each cylinder, the
final engine timing can be dialed-in.
Cleaned battery terminals, refilled batteries with distilled water (Thanks, Charlie).
Prepared drawings for distributor wiring and cylinder numbering. Drawings
were a great aid in thinking about the complicated ignition, and will be used to
document the final version.
Verified firing order shown in Leroi manual. Found more loose pushrod ends on
cylinders 1 – 2.
Distributors have dual points, a four-lobe cam, and a two-ended rotor. Firing
occurs on alternating points, (4 lobes x 2 points = 8 hits). Concluded, after
much experimentation, adjustment, etc. that distributor caps are no good. Since
replacement caps are not available (?), a search for new distributors will
commence. Criteria: adaptable to existing mounting and drive on engine,
8-cylinder with single points and 8-lobe cam.
Organized Plymouth and Leroi documents received from George Holt. “Originals”
will be kept in museum files, and where pertinent, copies will be made for shop
use.
Installed reconditioned air compressor unloader pilot valve. Testing will have
to wait until engine is running properly.
Traced sparkplug wiring and made drawing of current configuration. Confirmed
that left distributor controls head sparkplugs (outside of ‘V’), and that right
distributor controls block sparkplugs (inside of ‘V’). However, neither
distributor was wired in the published firing order of the engine, nor were the
two distributors wired the same as each other.
Removed valve cover on cylinders 3R/4R, and discovered that the cupped fittings
on both pushrod ends had become detached on cylinder 3R (and therefore the
valves on that cylinder were inoperative). No idea how this could have happened
– reattached fittings and adjusted valves.
Observations from today lead to amazement that the engine ever ran at all.
Before any rewiring of the distributors commences, the firing order will be
verified experimentally (rather than trusting the Leroi manual).
Began process of analyzing ignition system. All four coils and points seem to
work okay, but serious degradation of the distributor caps was observed (this is
not new information – caps have been in bad shape for some time, with previous
repairs attempted using epoxy potting compound).
During this process, the engine timing was disturbed to the point that the
engine now won’t start.
Small amount of water drained from crankcase ran clear (not green with
antifreeze!) This indicates that crankcase water is due to condensation only,
and is not caused by a coolant leak.
Cleaned 16 sparkplugs with pneumatic abrasive device. On five cylinders, both
plugs of each cylinder were dry, with only a moderate amount of carbon build-up.
However, on the three other cylinders, both sparkplugs of each cylinder were wet
with fuel, with very little carbon. This would indicate that those three
cylinders have been firing very little if at all. These ‘bad’ cylinders were 3L,
3R, and 4R.
NOTE: this logbook conforms to the Leroi Engine Manual’s convention of looking
from the gear-end (front) of the engine to identify left/right, with cylinder
numbering starting from the front.
Inspected oil-bath air cleaner. No oil!
Drained plain water from radiator, and replaced with 30% antifreeze solution (previously drained from Baldwin).
Replaced brake shoes.
Built wooden storage box for air whistle.
Temporarily installed air whistle for Annual Membership Picnic.
Demonstrated locomotive: started and ran up and down the track, with cab rides for the few members willing to withstand the backfiring.
"George E. Holt" lettering applied to both cab sides. A nice tribute to a great guy.
Washed exterior and undercarriage of locomotive.
Prepared for Annual Membership Meeting:
Vacuumed and washed interior of cab, stowed stuff from cab elsewhere.
Cleaned and polished air whistle.
Secured troublesome carburetor lever with stainless worm clamp.
Decision made (with Bart) to letter cab side with "George E. Holt", to honor long-time curator of the Plymouth.
Discovered missing bolt on compressor exhaust valve (again!) Replaced bolt, used Loctite and peened end of bolt. If bolt loosens again, fastening of valve must be changed.
Started and ran twenty minutes to verify compressor repair. Experimented with lever on carburetor (disconnected from governor long ago). In one position (away from carburetor), engine ran smoothly. The other position (towards carburetor) caused immediate backfiring. This lever in the wrong position may have caused the extensive backfiring observed on Dec 31. Need to fasten lever in correct position.
Removed air compressor unloader pilot valve for refurbishing. Located and contacted manufacturer R. Conrader Co. of Erie PA (since 1925!). Manufacturer offered to refurbish and calibrate valve at no charge. Valve sent to Conrader 1-19, via UPS.
Topped-off fuel tank.
Started and ran about 2 hours: backfiring only at first when cold. Performed switching, but did not complete job due to compressor failing again.
Performed extensive switching for several hours. Baldwin also in use for switching – another museum first! Accomplished major portion of plan to rearrange rolling stock.
Engine started easily, but continued to backfire even after warm-up. (A foggy morning, with much dew.) Backfiring was most pronounced at idle, especially when compressor was manually unloaded. Very little backfiring occurred during running. Good power was available from the locomotive.
Oil pressure dropped as operation continued. Two bottles of STP Oil Treatment were added, but little change was observed in pressure gauge reading. Crankcase full. Gauge is defective, sender line is clogged, or…
Started engine: easy start with fairly smooth running after initial warm-up. Tested air pressure pop-off valve: valve operated reliably at approx. 130 PSI.
Identified main air pressure regulator in cab. Operated regulator manually by lifting the lever: compressor unloaded properly, identified by a change in the sound of the engine, and a drop in air pressure. Regulator is either set above 130 PSI (above pop-off valve) or tripping mechanism is inoperative.
Cleaned and lubricated air pressure pop-off valve located on pipe from compressor to main reservoir. (Thanks, Bart.)
Bolt securing exhaust valve “sandwich” had worked loose, and was no where to be found (presumably was shot out the exhaust port, and is currently residing in main pipe or reservoir). Replaced bolt and secured with Loctite.
Pressure tested system from stationary air supply, but still could not raise pressure in main reservoir. Cleaned burrs from copper seating washer on exhaust valve, and tightened set-screws on intake and exhaust valve hold-downs.
Retested system and main reservoir began holding pressure. Started engine and pressure slowly climbed to 75-80 PSI, and held there. Ran locomotive up and down the track a few times, but then pressure began to climb again, reaching 145 PSI when engine was shut down. Unknown if pressure would have gone higher given more time. Pressure release on air system did not blow.
Engine start was not immediate, and required extensive cranking. After starting, it ran poorly, acting as if only a few cylinders were firing. Performance smoothed out after a few minutes.
Installed newly-upholstered fireman’s seat cushions. Nice job, Jane!
Added 55 gallons fuel. Started very easily, ran smoother than before, and only backfired a few times. Air pressure gained slowly to an acceptable level.
Performed minor switching to push a few cars together. When work was almost complete, air pressure went to zero. Attempted to recharge from the stationary compressor, but could only reach 28 lbs. Limped back to home base with great caution and the hand brake.
After shutting down, again attempted to recharge air. Air rushing inside the compressor could be heard, and air exiting the compressor intake could be felt. One or more of the valves are probably broken or stuck.
Completed re-assembly of compressor valves.
Locomotive moved under its own power for the first time in nearly two years! This date marks the first time in the museum’s history that the Plymouth and the Baldwin were running simultaneously.
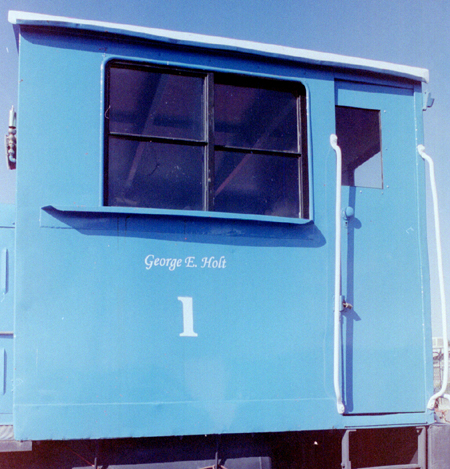