This 25-ton crane was built for the U. S. Army in 1943. The unit was stationed at the Navajo Army Depot near Bellemont, Arizona (west of Flagstaff). The unit was sold to Valley Steel and Supply Company, Tempe, Arizona where it served until 1995. Valley Steel and Supply donated the crane to the Museum and it was delivered by the Union Pacific Railroad on June 28, 1997.
Stats
| Builder : | American Hoist and Derrick Co., St. Paul, Minnesota |
| Serial Number : | 1924 |
| Power Unit : | Caterpillar D-13000 (with 2 cylinder gasoline pony engine for starting) |
| Power Unit Number : | 3S2419SP |
| Cylinders : | 6 |
| Bore & Stroke : | 5 3/4" x 8" (1246 Cu. In. total displacement) |
| Approx. Weight : | 5610 Lbs. |
| Maximum Torque : | 825 Ft.-Lb. @ 800 rpm |
| Maximum HP : | 145 BHP (Max) @ 1000 rpm |
| Oil Capacity : | 8.5 Gal. (34 Quarts) |
| Coolant Capacity : | 28 Gal. |
| Pony Engine : | 24 HP, 2 cylinder, 4 stroke, 82.5 CID (12 V starter for pony engine) |
| Pony Engine Carburetor: | Zenith, 5F13472/10322 |
Used ARM Machine Shop to fabricate replacement bracket. Spent time "trueing" the mills axis to machine surfaces square.
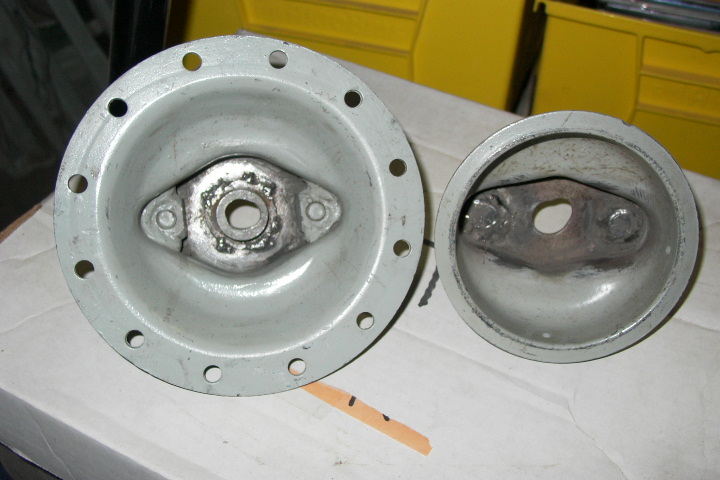
Repaired two of the Bendix air cylinders by welding. One needed two new mounting studs, the other required the piston shaft guide bushing to be repositioned.
Two Bendix air cylinder housings repaired!

Drilled holes in the four ballast compartments. These compartments are open to the weather and frequently collected rain water. Steve Whisel and Tom Klobas began the process of washing out six decades of accumulated crud.
Volunteers from local Boy Scout Troop painted the new weather panels with gloss black paint. Old panels deteriorated to non-functional condition. Removed broken drain pipe on radiator. Installed new pipe. General cleaning of debris from deck in preparation for moving.
IT'S ALIVE!
Began the morning with basic fluid check. Added two jugs of anti-freeze to the radiator and filled with water. Was able to FINALLY remove and unclog the radiator drain plug. The about of "crud" behind the plug was amazingly little. First step towards a complete coolant flush.
After 3 years of sitting idle, the diesel engine was restarted. The boom needed to be lowered in preparation for moving the equipment to the new Tumbleweed Park (the rail line goes under the Loop 202 to reach the park).
The carburetor for the Pony Engine required some cleaning to remove the old gas. A new battery was installed and the Pony Engine started after adding fuel. Adjusted the governor throttle control arm to lower the idle speed. Noticed a considerable amount of oil and air leaking around the valve cover seal. Will need to replace the gasket.
The D-13000 turned over after a few seconds of cranking. Noticed coolant leak around the water pump shaft. Will need to remove and repack. Set the throttle to about 50% and let idle.
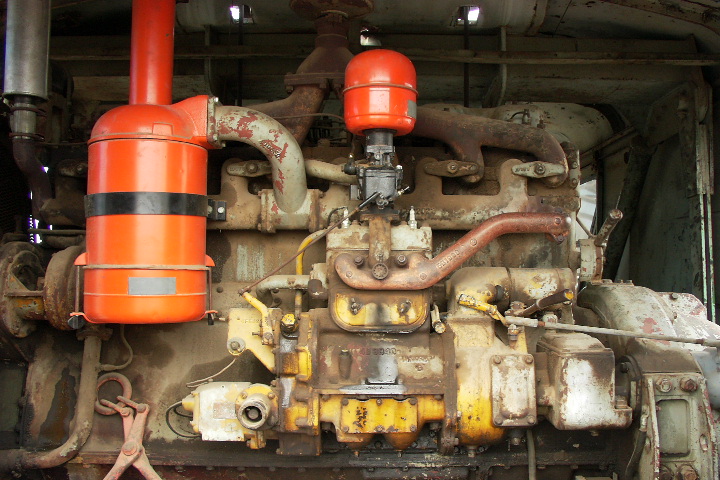
View of Caterpillar D-13000 w/Pony Engine from rear of the cab. A bit grungy, but operational.
With the diesel running, attention shifted to the control pneumatics. Connected the recently installed main control valve. No leaks! The rebuild appears successful. After removing a mud wasp nest from the master clutch control line, it was connected to the control valve. The master clutch operated perfectly and when engaged produced a humongous cloud of dust from drive gears after 3 years of idleness.
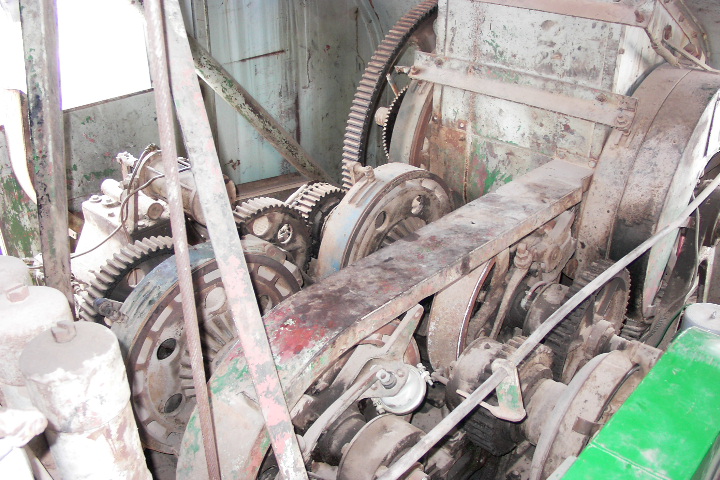
Interior showing various drive clutches. Master Clutch is lower right near green shield.
With the basic pneumatics now connected, the boom was raised and lowered several times while applying a quart of oil to the cables. Finally, the boom was positioned to clear the highway underpass.
Also checked the train brakes. There is an air leak around the brake cylinder piston rod. Will need to investigate the severity.
After two hours of running, the diesel was shut down. A good day.
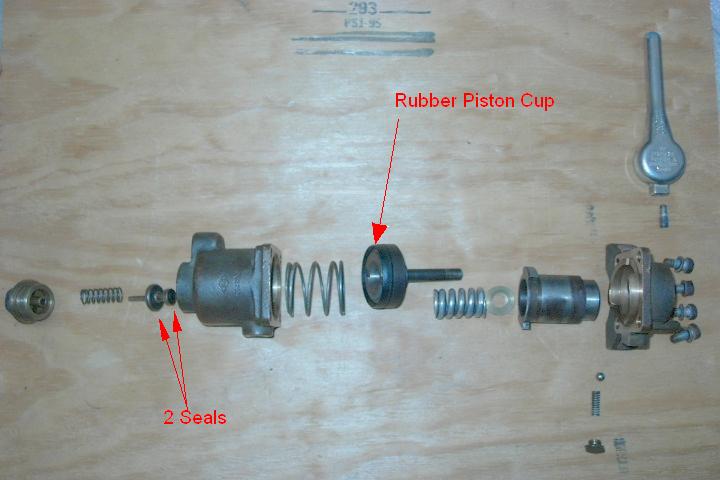
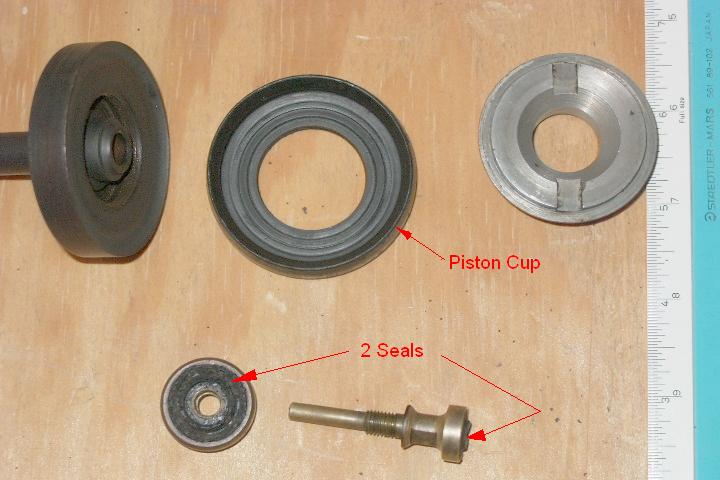
Replacement piston cup (fabricated from leather) arrived and installed. The Bendix HP valve has been rebuilt and installed into the cab. The whistle valve was also rebuilt with two hand made rubber gaskets. New battery procured for the Pony engine starter. Battery runs the 12V starter on the gas powered, 2 cylinder 24Hp Pony engine which is used to start the D-13000 diesel. Repaired a broken fitting on the gas line to the Pony engine. Replaced the rubber seal on the gas line dirt collector.
Took inventory of remaining pneumatic cylinders needing to be rebuilt. Over the years, the pneumatics were replaced with whatever type was available. Currently, the following Bendix-Westinghouse cylinders are installed:
Production: Type 9, Type 12.
Obsolete: Type D (same size as Type 9), Type A (same size as Type 12)
Removed starter battery for replacement. Flushed remaining gasoline from Starter Engine tank (dirt trap). Added fuel conditioner to main diesel tank. Cleaned area around engine in preparation for starting. Re-attached cab side. Required help from Tom Klobas and Andy Szabo to convince the steel side panel to cooperate.
Sourced a 2-1/8" piston cup. Company will fabricate leather replacement to match the original Bendix print. Will take 2 weeks to make, plus delivery time.
Fabricated two of the flat gaskets for the Bendix valve. Still trying to source 2-1/8 piston cup.
Tom Klobas continued to remove the remaining small debris from the ballast bays. Now ready to install the drain holes to prevent water accumulation. Steve Whisel continues to search for repair parts for main Bendix valve. Apparently, 2-1/8" Piston Cups are an odd (impossible?) size to find.
Tom Klobas and Steve Whisel were able to finally remove the last five lead ballast blocks from the last ballast bay. Almost all the corroded material has been removed.
After a loooong hiatus, this project is starting to get some attention. The main pneumatic control valve was disassembled to investigate the nagging problem of constantly bleeding air pressure during operation. Upon disassembly, it was discovered that all of the rubber components have disintegrated. Inquiries to Bendix indicate that this is a long obsolete type "HP" valve. Hope remains that parts are available. Mechanically the valve is sound (no wear/rust). This valve leaked from the very first operation under ARM ownership and is the first pneumatic component in the rebuild of the cab controls.
|
|
|
|
Removed 6 more lead blocks (hopefully the last) and about 20 more shrapnel canisters. Two compartments are empty. The third is has two pieces that need to be cut into smaller pieces. The fourth has several large pieces that are blocking further removal of scrap material. Will need to grind open the access hatches to extract remaining material.
Continued to work on cleaning out the two aft "ballast" bays. Using the magic wand (aka the magnet), managed to fill two coffee cans of loose shot material out of the bay under the engine, and pulled five coffee cans of loose shot and 12 canisters (yes, they keep on coming) out of the cab-side bay. Both bays appear to be nearing the point where only a scattering of shot material remain (not counting the lead bars in the former).
Tom Klobas used the large "nail" magnet and "swept up" the loose shot material on the ground around the crane. Also used it to extract more loose shot material from the ballast bays. It worked like a charm! Got about 3 coffee cans of material out of them.
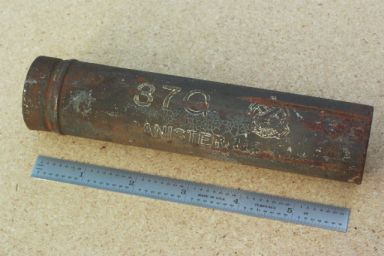
Another big day of removing scrap material. Filled another barrel for disposal. Pictures below show the material being removed. It is classified as M2 Canister projectile for the 37mm M5 & M6 gun (used on several "medium" tanks including the M3 "Grant", M5 "Stuart" and the T17E1 "Staghound" Armored Car). Each canister contains 122 steel pellets. Only a few of the canister removed show any markings. The one shown in the pictures is labeled "37G" and "CANISTER M2". There is also an emblem of two canons crossed inside a circle (just right of the 37G).
 |
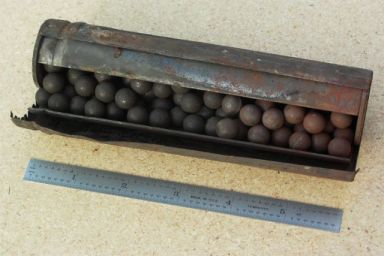 |
Tom K. and Steve W. removed 12 lead blocks and over 100 shrapnel canisters from the frame. The simplified removal process makes it possible for one person to remove the lead blocks. The canisters are approximately 1.25" in diameter and about 6" long. Inside the metal wrapper is 50 to60 3/8" diameter steel "pellets".
Tom K. and Steve W. continued removing "ballast" material.
Crew spent most of the day helping with "bullpen" cleanup. Steve W. developed an easier way to remove the "ballast" from the crane. Removed 4 blocks in less than one hour. All of the window frames have been cleaned and returned. Installing polycarbonate (Lexan) windows will be project for the summer.
More "ballast" removal. One pocket completely empty.
Continued removal of the "ballast". Filled another two barrels with scrap metal. One pocket is almost empty.
Continued with the removal of the "ballast". Museum members, Tom Klobas and Andy Chinn pulled scrap metal from two pockets. Also participating was the son (Mike) of a Boeing "Good Neighbor Day" volunteer. Together, the team removed enough scrap metal to completely fill two 55 gallon drums. Additional material was removed from the crane and staged until the barrels can be emptied.
The battery accepted an overnight charge. Pony engine started on the first try. Had to re-prime the diesel injector pump and fuel lines. After some cranking, the diesel started with a belch of white smoke. Ran the diesel for about 1 hour. Added fuel stabilizer to the fuel tank. Verified that the rebuilt air compressor is making air. The repaired main drive shaft is working well. The air compressor pulley runs true with no wobble.
Installed 2" plug in end of main air reservoir. Prepared the Caterpillar diesel engine for starting. Added oil to pony engine crankcase and gear box. Added water to radiator and checked oil level of the diesel. Dead battery prevented starting. Battery removed for charging.
Installed second of eight rebuilt air-cylinders. The air cylinder controls the main drive clutch from the diesel engine. New diaphragm and dust boot were installed. Re-installed the safety guards around the drive chain. Removed a significant amount of "ballast" from frame. Recent rains filled the "ballast" compartments with water. Siphoning reduced trapped water. Preliminary work on pressure testing main air reservoir. Plugged six manifold ports on rebuilt cab stand. Some window frames have been sand-blasted and returned to the worksite. Two air cylinder parts were sent out for welding to repair broken welds and to replace worn mounting studs.
Installed first of eight rebuilt Bendix-Westinghouse air cylinders. The cylinder (Type 9) was completely stripped, sandblasted and repainted. A new diaphragm, dust boot, return spring and two-piece clamp were installed. Ongoing work to remove scrap metal "ballast" from frame. The ballast appears to have been a combination of obsolete military (canisters of shrapnel) and miscellaneous pieces of scrap metal. The material is exposed to the weather and traps moisture during rainstorms. The moisture is causing surface rust of the frame members.